Compiler and IDE
Be sure to have read the command line lesson.
C++ compiler at a high level
Section titled “C++ compiler at a high level”In short:
- You write the text files (source files with code).
- You run the compiler program that reads these files and outputs an executable file.
- You can then run the executable file (for example on the console).
Executable files contain machine code, so the instructions, as described in the first lesson.
For better understanding:
Read this blogpost, it has pretty good wording in my opinion.
You may watch this video as well, for a general understanding.
Compiler installation
Section titled “Compiler installation”There are a few options when selecting a compiler (on Windows):
- Install Visual Studio, which installs the MSVC compiler.
- Install GCC via MinGW or similar.
- Install Zig, which has a C++ compiler.
The simplest option of all is installing Zig. You just have to unpack the archive, and it just works.
Zig installation
Section titled “Zig installation”- Go to the Zig installation page
- Download the zip for your architecture (probably a file like zig-windows-x86_64-blah-blah.zip)
- Unpack the zip somewhere, I recommend just putting the contents in
D:\zigor something simple like that. - You can now call the compiler on the command line by typing the full path to the compiler
program, like
D:\zig\zig.exe.
Adding Zig to your PATH
Section titled “Adding Zig to your PATH”For more convenience, I recommend adding the folder to your PATH environment variable,
in order to be able to call the compiler by just typing zig.
To do that (on Windows 10):
- Open the start menu (by hitting the windows key)
- Type
Edit environand select the optionEdit environment variables for your account - Find the
Pathvariable and click on it: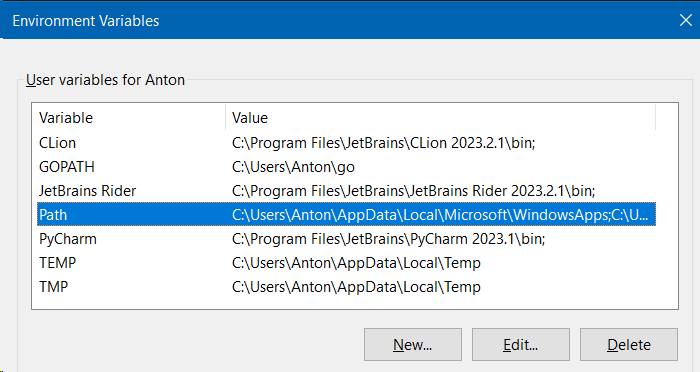
- Click
Editto edit the variable - Press
Newand type in the path where you unpacked Zig, for exampleD:\zig
Running the compiler
Section titled “Running the compiler”Zig is actually a compiler for the Zig programming language, but we can use it to compile C++ instead. This works because Zig includes a C++ compiler.
To run the compiler, you just need to type zig (or the full path to zig.exe)
on the command line, followed by the arguments you want to pass to the compiler.
To call the C++ compiler, you need to pass the argument c++ to Zig.
And then the least you need is to pass it the file path of the source file you want to compile.
For example, if we are located in the same folder as the file main.cpp, we can compile it like this:
zig c++ main.cppThis produces an executable named a.exe, which we can run like this:
.\aNow the first time you run the compiler, it’ll take a while to cache some things, but on subsequent runs it’ll be faster.
Enabling “warnings as errors”
Section titled “Enabling “warnings as errors””To treat warnings as errors, you can pass the argument -Wall and -Werror to the compiler.
This will make the compiler fail if it encounters any warnings.
zig c++ main.cpp -Wall -WerrorI recommend you do that, especially if you are a beginner, because this will likely save you a few hours of banging your head against a wall.
Specifying the output file
Section titled “Specifying the output file”By default, the output executable is named a.exe, but you can change that like this:
zig c++ main.cpp -o my_program.exeThat will produce an executable named my_program.exe instead of a.exe.
Configuring the IDE
Section titled “Configuring the IDE”You can program in any IDE or text editor you like, but I suggest you use Visual Studio Code. That’s because it’s free and I know how to configure it. You’re free to use whatever you want though, but don’t expect me to be able to help you with e.g. Visual Studio.
Configuring Visual Studio Code
Section titled “Configuring Visual Studio Code”- Install Visual Studio Code (come on, you can manage that yourself).
- In the “extensions” tab in Visual Studio Code, search for C++, and install the first extension.
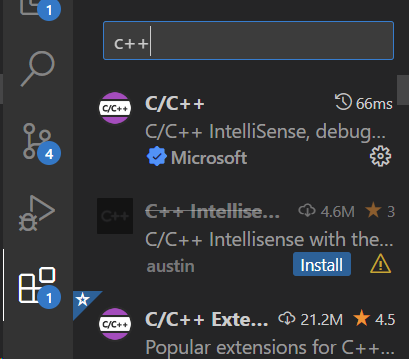
- Copy-paste the folder
.vscodefrom this repository into your project folder. It will allow you to compile + run the currently open file by pressingF5.
The configuration that you’ve copied (.vscode) contains a few files, among which are:
launch.jsondefines a configuration that allows the IDE to run a given compiled file.tasks.jsonwhich defines a task with the command that compiles the current file.
The configuration in launch.json has the line "preLaunchTask": "Zig C++ build current file",
which makes it execute the task Zig C++ build current file before running the program.
This is the task that’s defined in tasks.json,
which just executes the zig compiler on the current file.
You can just modify the compiler that’s used from
zig c++to e.g.gccif you use that, but then you’ll also probably have to modify the launch configuration to use thegbddebugger, so you’re on your own there.